The appearance of the YesSearch search engine on your web browser is enough to spoil your web surfing experience. This search engine not only intrudes your browser settings, but also disrupts your web browsing which can seriously reduce your work productivity. Therefore, in this removal guide we will provide complete details about this infection and also explain how to remove YesSearches from your computer.
What is YesSearches?
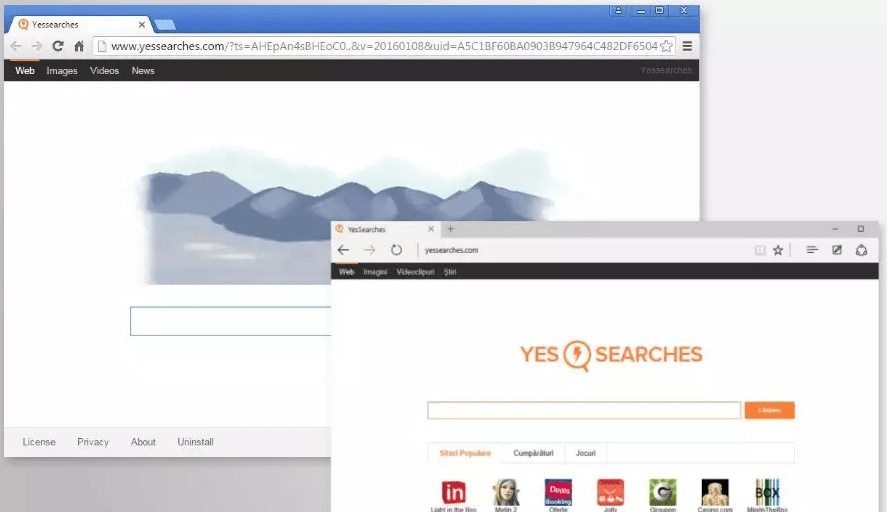
YesSearches is a browser hijacker infection. As the name suggests this infection hijacks the setting of your browser to make yessearches.com its default search engine, thus, replacing the search engine configured by you. Once installed on your computer, this hijacker drops uninst.exe, Clqvufsrv.exe and ShortcutBoost.exe on the computer start-up list and launches them each time you start your computer.
Most of these changes may not seem dangerous, but they are highly annoying and at times dangerous. Firstly, the search results you get from YesSearches are mostly bogus as they are filled with fake and sponsored results. Moreover, the additional apps this hijacker runs on your computer reduces the performance of your computer and makes your computer vulnerable to other more dangerous infections. Therefore, the moment you detect this browser hijacker on your computer you must use our removal technique to get rid of YesSearches from your computer.
How YesSearches Entered Your Computer?
Most probably this potentially unwanted program (PUP) entered your computer bundled with some other freeware program. While you were installing a freeware you didn’t notice the additional programs that freeware was installing on your computer and YesSearches got installed without your knowledge. You notice its presence when you find that your default search engine has been replaced by www.yessearches.com. Now that this browser hijacker has infected your computer there is no use trying to adjust or change your browser settings. The only way out of this situation for you is to follow the removal method given below to uninstall YesSearches from your computer.
How to Prevent Entry of YesSearches?
As described above, this browser hijacker enters your computer with other freeware programs. Therefore, you must download freeware from reputed sites and after thoroughly scrutinizing their authenticity. While installing a program you should opt for advanced or custom installation process so that you can view and select the programs which will install with that program. Most importantly, you should keep a reputed anti-virus and an anti-malware installed on your computer so that they can prevent or at least immediately detect the entry of such infections.
How to Remove YesSearches?
We will start by uninstalling YesSearches application from the computer, then we will remove its entries from the web browsers. Our uninstall process is for Windows 7, but you can follow the same steps for other Windows OS as well.
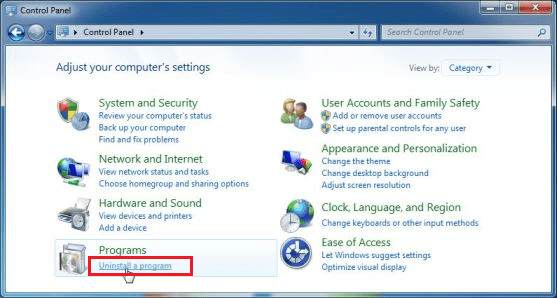
- Click ‘Start’ button and choose ‘Control Panel’.

- Inside Control Panel, click on ‘Uninstall a program’ under ‘Programs’ section.
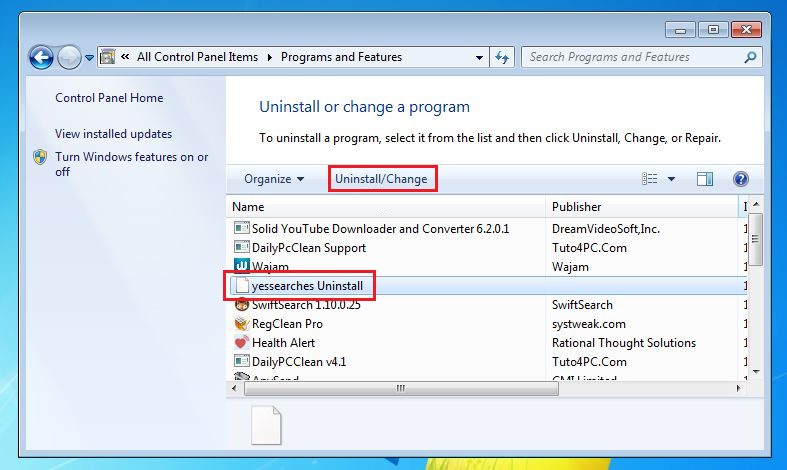
- In the list of installed programs, locate and select ‘yessearches’ and click on ‘Uninstall’. Then, follow the prompts to complete the uninstall process.
- Now that you have removed YesSearches browser hijacker from your computer you should proceed to removing its entries from your web browsers.
1) Remove YesSearches from Firefox (FF)
Remove dangerous extensions:
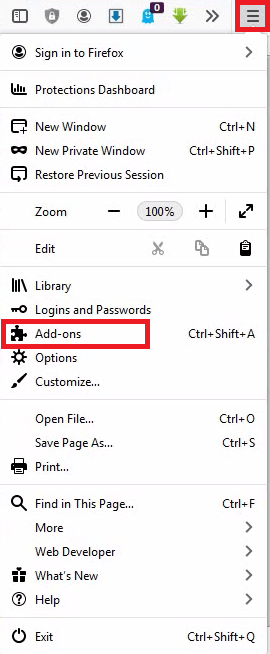
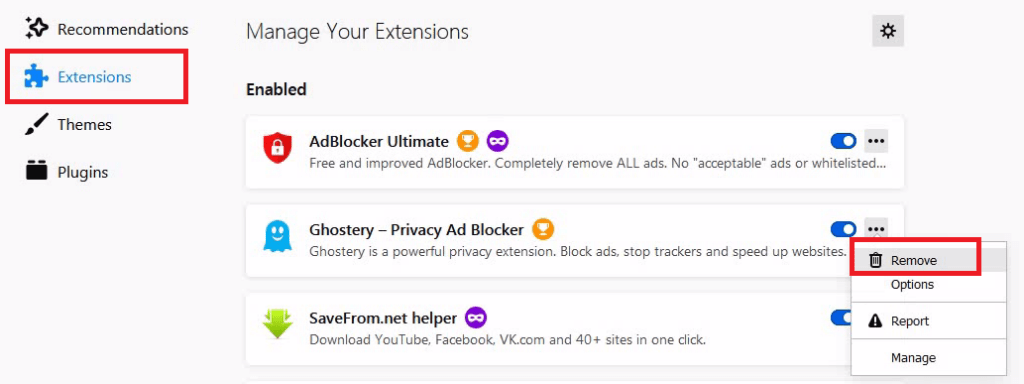
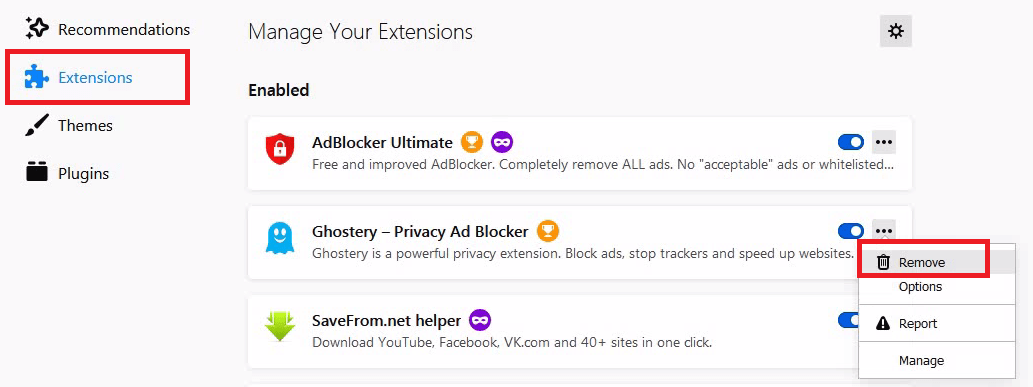
- Open FF browser, click on ‘Menu’ button (3 horizontal lines), then select ‘Add-ons’.
- Click the ‘Extensions’ option in the sidebar to view the list of extensions installed on your FF. From the list of extensions, locate suspicious extensions, click on the ‘3 dots’ in the front of them and choose ‘Remove’ option. Do this for all the suspicious extensions.
Change default search engine:
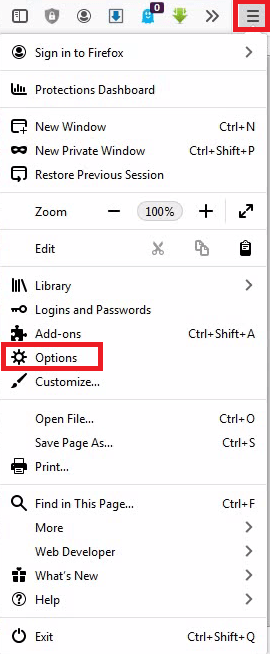
- Click on ‘Menu’ button and select ‘Options’.
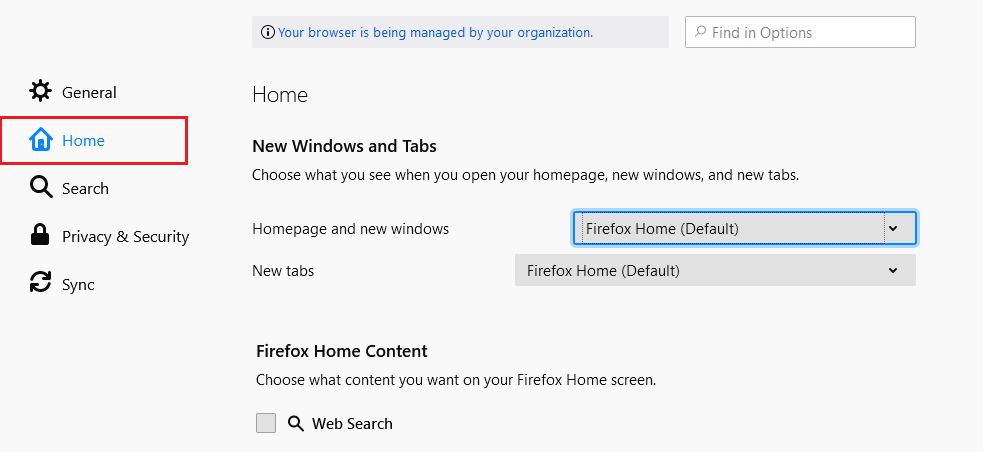
- Choose ‘Home’ option from the sidebar and change your default search page.
Clear cookies and site data:
- Click on ‘Menu’ and choose ‘Options’.
- Choose ‘Privacy & Security’ in the sidebar and click on ‘Clear Data’ button under ‘Cookies and Site Data’ section.
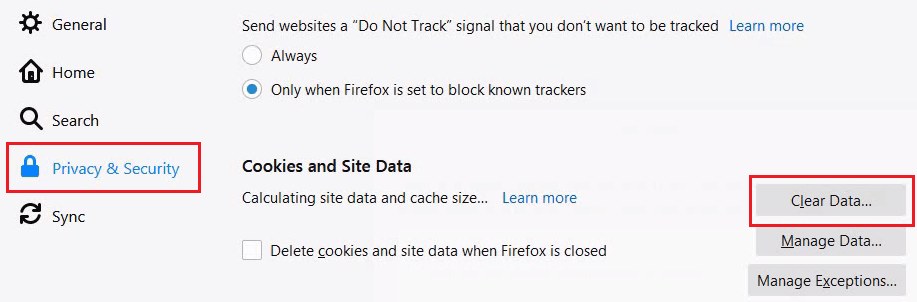
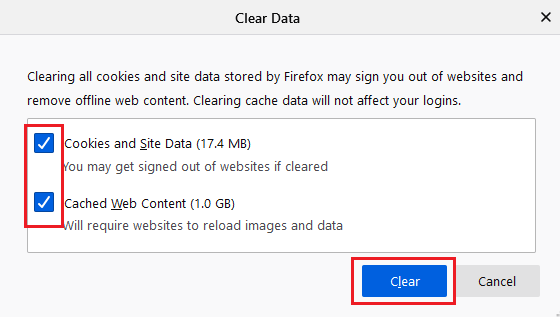
- Select ‘Cookies and Site Data’ and ‘Cached Web Content’ options, then click on ‘Clear’ to clear all your cookies and site data.
Reset Firefox browser:
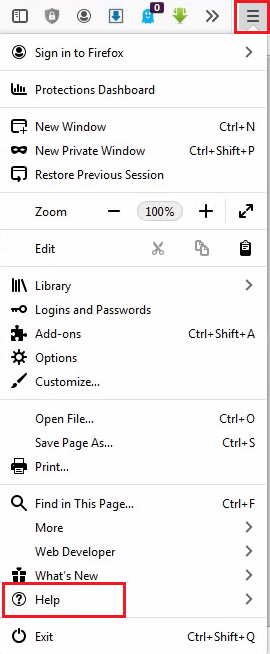
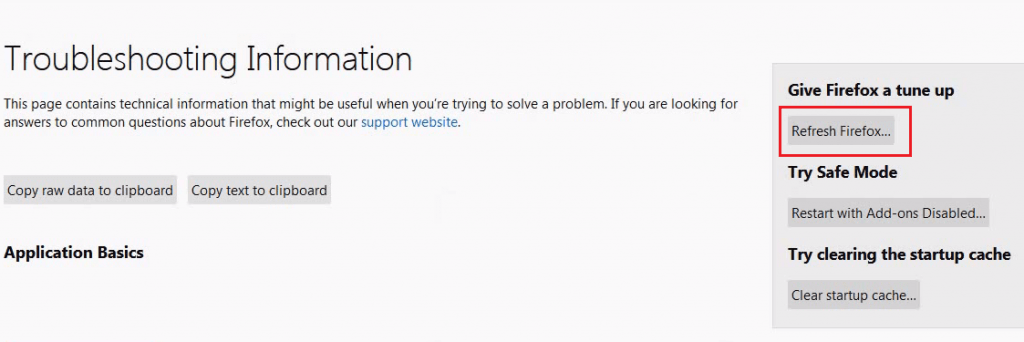
- Click ‘Menu’ and choose ‘Help’.
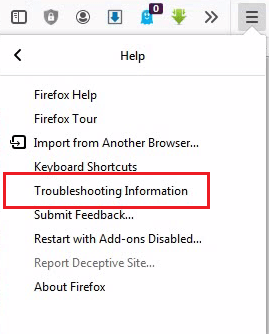
- In Help sub-menu, choose ‘Troubleshooting Information’.
- In the Troubleshooting Information page, click on ‘Refresh Firefox’ button.
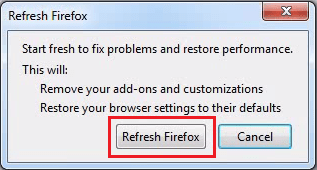
- In the pop-up box, choose ‘Refresh Firefox’.

You have successfully removed all the YesSearches entries from your Mozilla Firefox.
2) Remove YesSearches from Google Chrome (GC)
Remove malicious extensions:
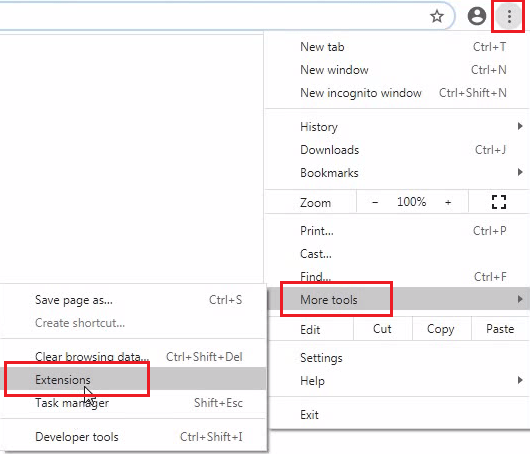
- Open GC browser, click on ‘Menu’ button (3 vertical dots), then select ‘More Tools’ and go to ‘Extensions’.
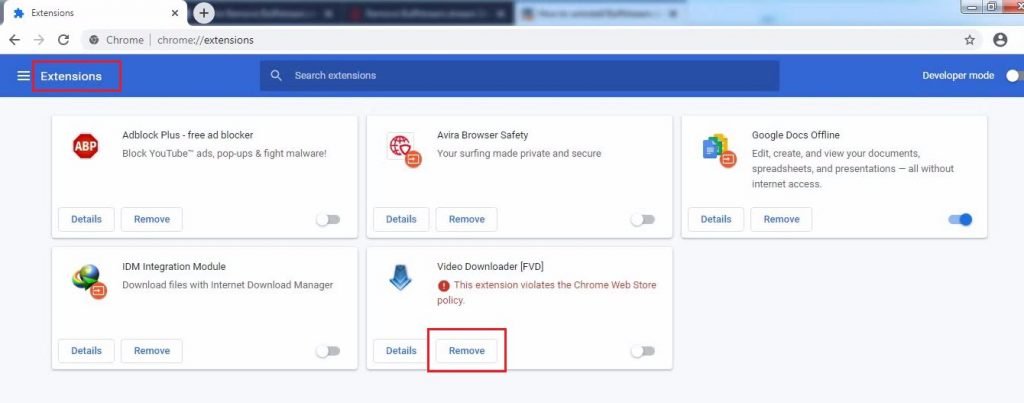
- In the Extensions window, you will find the list of extensions installed on GC. Click on the ‘Remove’ button associated with an extension to uninstall that extension. Do this for all suspicious extensions.

Clear cache and web data from GC:
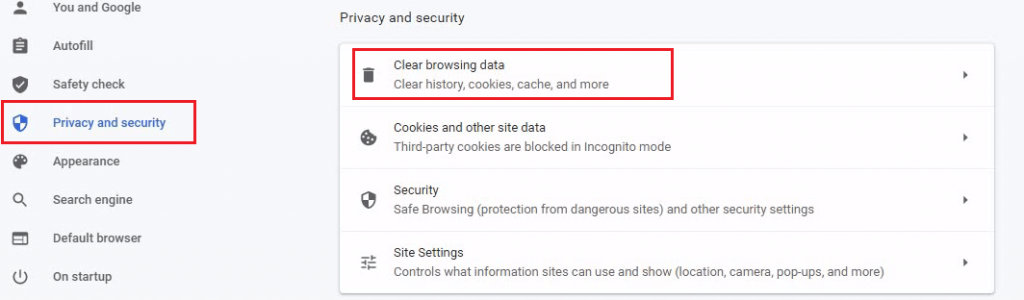
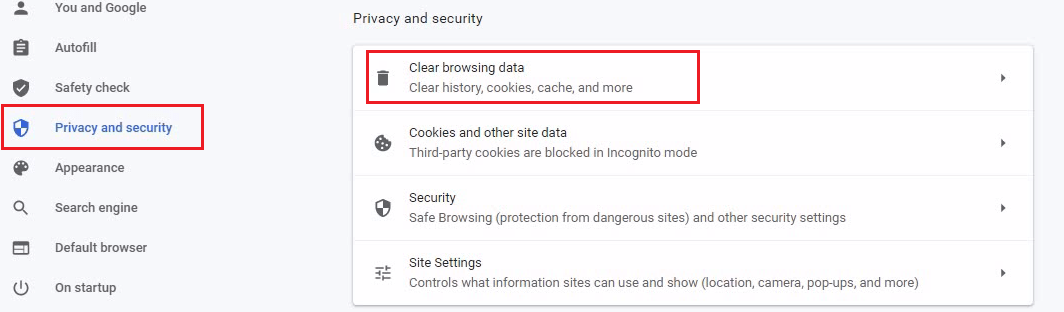
- Click on ‘Menu’ and select ‘Settings’.

- Click ‘Privacy and security’ on the sidebar and select ‘Clear browsing data’ option.
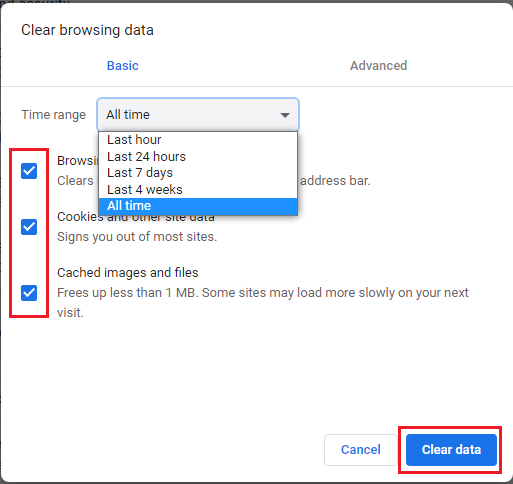
- In the Clear Browsing Data window, choose ‘Browsing history’, ‘Cookies and other site data’ and ‘Cached images and files’ options. Select ‘All time’ in the Time range. Then, click on ‘Clear data’.
Change the default search engine:
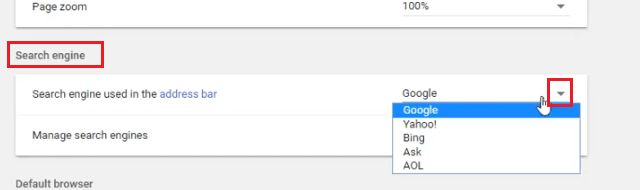
- Click on ‘Menu’ and choose ‘Settings’.
- Scroll down to ‘Search engine’ section and click the down arrow in front of the ‘Search engine used in the address bar’ to select your default search engine from the drop-down list.
Reset Chrome browser:
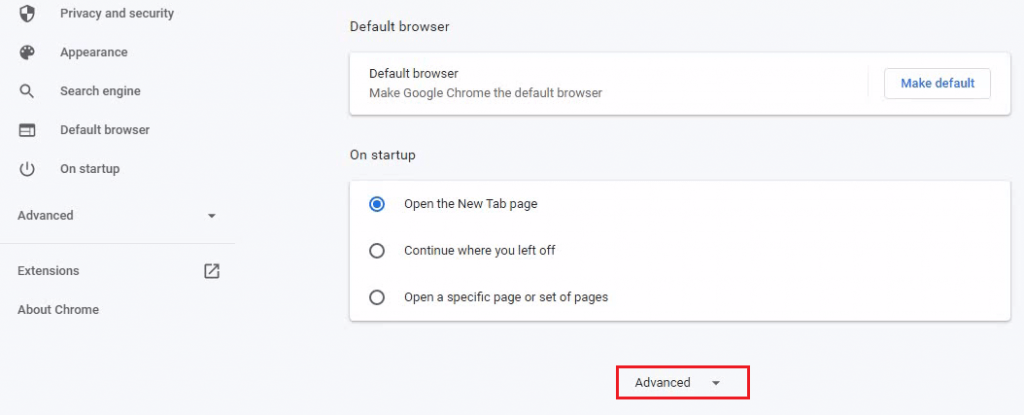
- Click on ‘Menu’ and choose ‘Settings’.
- Scroll down to locate and click ‘Advanced’ option.
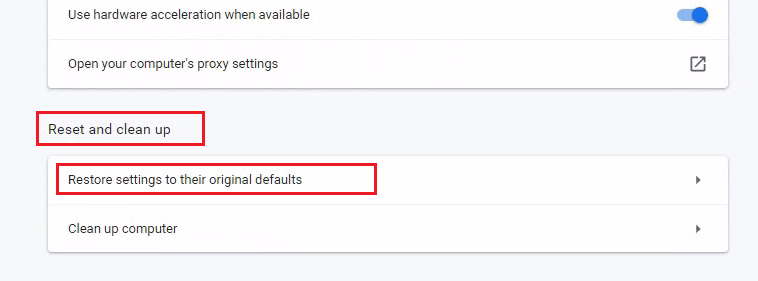
- Find ‘Reset and clean up’ and click on the ‘Restore settings to their original defaults’ option.
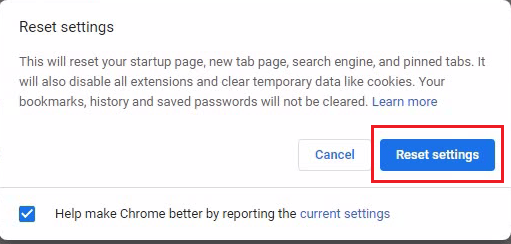
- In the pop-up window, click on ‘Reset settings’.
You have successfully removed all the YesSearches entries from your Google Chrome.
Conclusion
Now that you know how to remove YesSearches from your computer follow the removal process carefully. It’s important to remove this infection from your browsers otherwise it can reappear on your computer.