Destiny 2 is an extremely popular game and equally popular is its error ‘Destiny 2 Servers Not Available’. Yes, rarely will you find gamers who have played the game and haven’t faced this error while playing it through Destiny servers. However, this Destiny 2 error can be easily fixed if you follow the right procedure. Since there can be multiple reasons causing this error, there are multiple solutions. In this guide, you will learn about a working method to fix ‘Destiny 2 Servers Not Available’ issue.

Why ‘Destiny 2 Servers Not Available’ Error Occurs?
There can be multiple reasons causing this error. For instance, Destiny 2 is a popular game and many users worldwide are connected to its servers and many more are always trying to connect. Therefore, sometimes due to overload the servers of this game show an unavailability error. In such a situation, it’s better to try connecting again after sometime and most probably you will succeed.
However, in some cases, the problem is on the player’s end. It can be anything, maybe the network connection is improperly configured, the network connection is unstable or there is some problem with the network drivers. For all such problems you will have to solve them yourself. Don’t worry, we will address all these problems and their solutions below, so that you can fix them quickly and easily.
Steps to Fix ‘Destiny 2 Servers Not Available’
The solutions we have given below will solve a specific problem. If you don’t know what is causing this error on your computer, then you can try these solutions one-by-one. All the changes you will make on your computer while implementing these solutions are completely reversible.
A) Disable DHCP
Dynamic Host Configuration Protocol (DHCP) when enabled can interfere with your Destiny 2 server connection. Therefore, disabling DHCP is a simple way of fixing this issue.
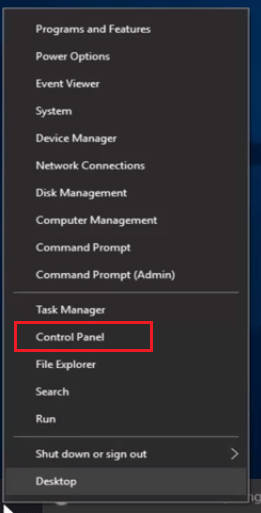
- Right click ‘Start’ button and select ‘Control Panel’.
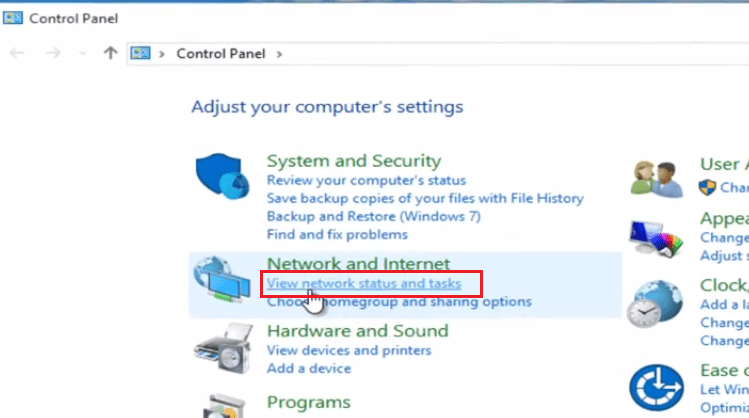
- In the Control Panel, click on ‘View network status and tasks’ under ‘Network and Internet’.
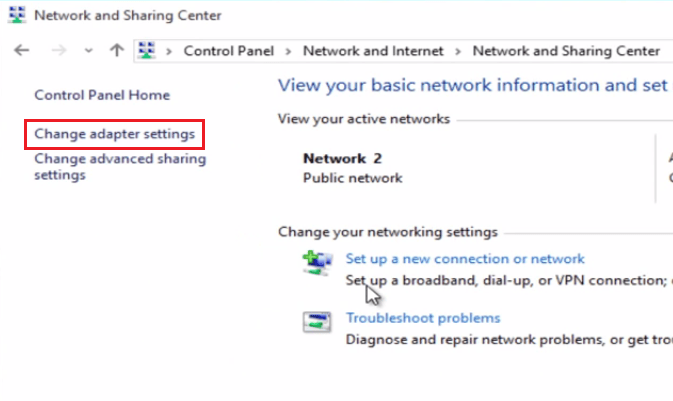
- Click on ‘Change adapter settings’.
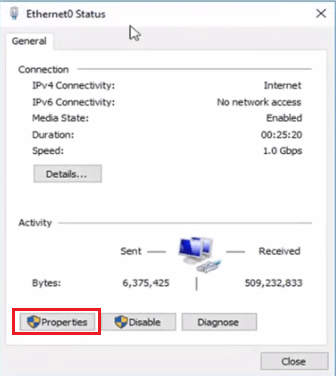
- Double click on ‘Ethernet’ connection.

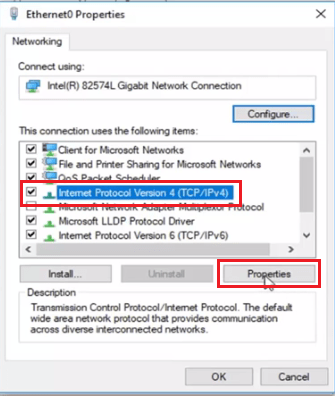
- Click on ‘Properties’.
- In the list of items, locate and select ‘Internet Protocol Version 4 (TCP/IPv4)’, then click ‘Properties’.
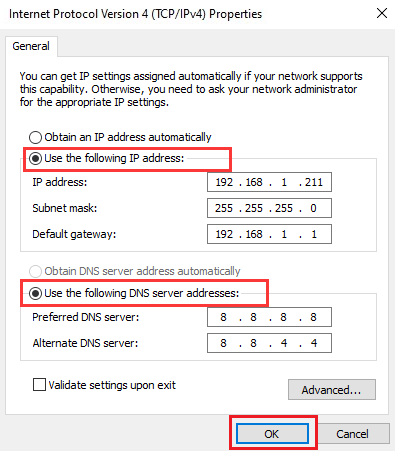
- Select to enable ‘Use the following IP address’ and ‘Use the following DNS server addresses’. Enabling them will automatically disable DHCP. Put in the values for IP address and DNS Server address, then click ‘OK’.
- You must now restart your computer for the changes to take effect. Launch Destiny 2 after restart and check whether the issue has been resolved or not. If the problem persists, then go to the next solution.
B) Reset TCP/IP Address
This solution is suitable for users whose network has gotten corrupt. The best solution in such a situation is to reset the TCP/IP address of your computer.
- Right click ‘Start’ button and choose ‘Command Prompt (Admin)’.

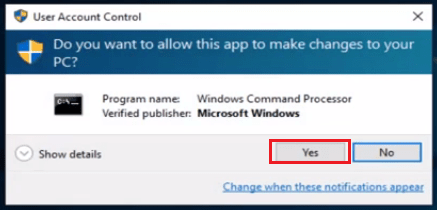
- Click ‘Yes’ to proceed.
- Type ‘netsh winsock reset catalog’ command and press ‘Enter’.
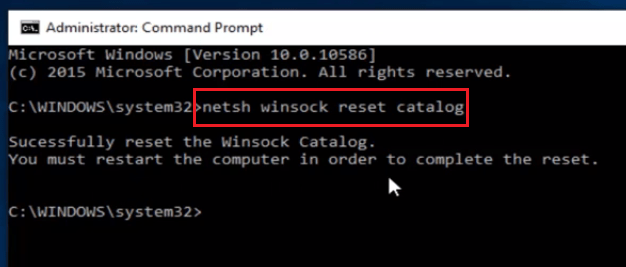
- Restart your computer to complete the reset. After restart try to connect to the Destiny 2 server. If the connection fails, then move to the next solution.
C) Update Network Driver
If the problem is due to network drivers, then the solution is to update the drivers of your network adapter. This can happen if you install a new device whose driver may be conflicting with your network adapter drivers. Follow the steps given below to update your network driver.
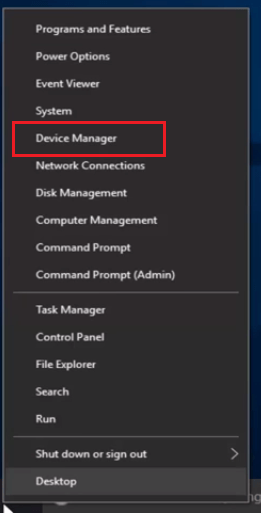
- Right click ‘Start’ button and select ‘Device Manager’.
- In the Device Manager window, expand ‘Network adapters’ category. Find and right click your network adapter in the list and choose ‘Update driver’.
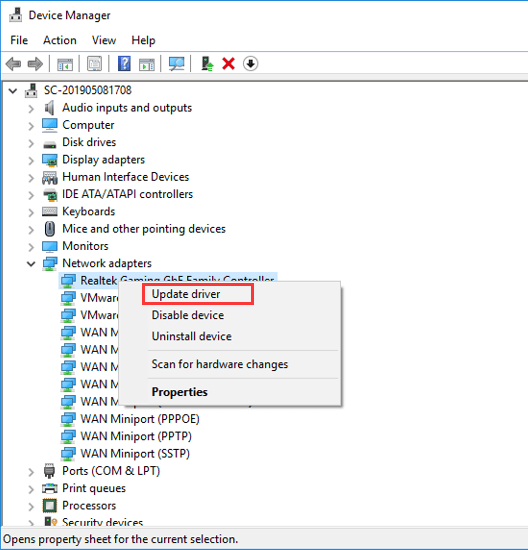
- Select ‘Search automatically for updated driver software’. Just follow the instructions as they appear to complete the driver update process.
Once the driver is updated, you should restart your computer. Try to connect to the Destiny 2 server. If it fails, then move to the next fix.
D) Use Ethernet Connection
Sometimes when you try to connect using Wi-Fi problems may arise. Wi-Fi is slower than Ethernet and also multiple users may be accessing your Wi-Fi connection. Both of these reasons can reduce the chances of your computer connecting to the Destiny 2 server. Preferably, you should use the Ethernet connection as it’s the fastest and most stable connection. Therefore, disable all other connections so that Destiny 2 has no other option but to connect using an Ethernet connection.
- Right click ‘Start’ button and select ‘Control Panel’.
- In Control Panel, click on ‘View network status and tasks’ under ‘Network and Internet’.
- Click on ‘Change adapter settings’.
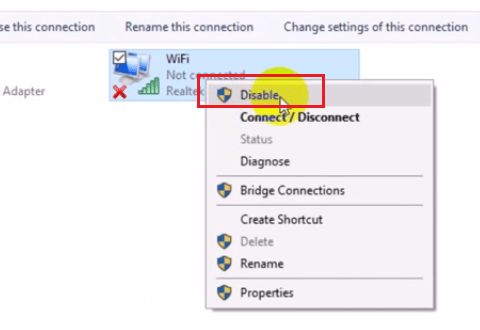
- Right click the ‘WiFi’ connection and select ‘Disable’. Repeat this process for all the other connections you don’t require.
- Now if you try connecting to Destiny 2 server, then it should work as normal. If your problem is still unresolved, then move to the next solution.
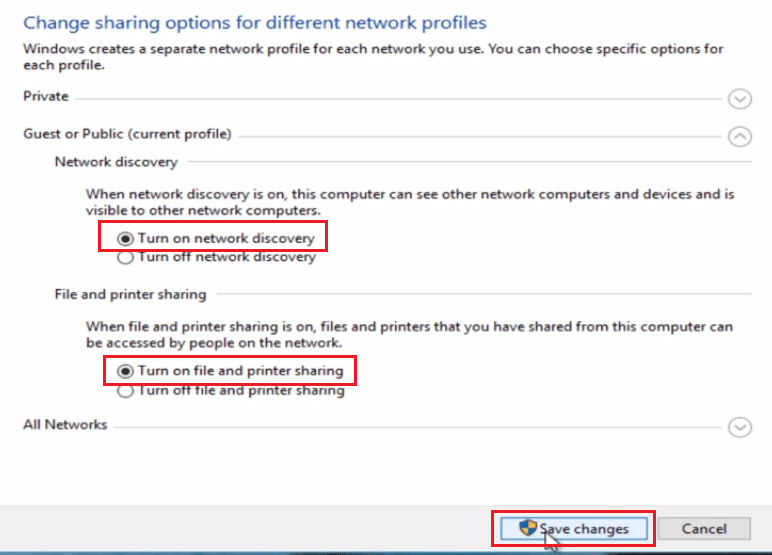
E) Turn On Network Discovery
Turning on network discovery on Windows 10 has been able to solve this problem for some Destiny 2 gamers. So, you can try this solution by following the steps mentioned below.
- Right click ‘Start’ button and select ‘Control Panel’.
- In Control Panel, click on ‘View network status and tasks’ under ‘Network and Internet’.
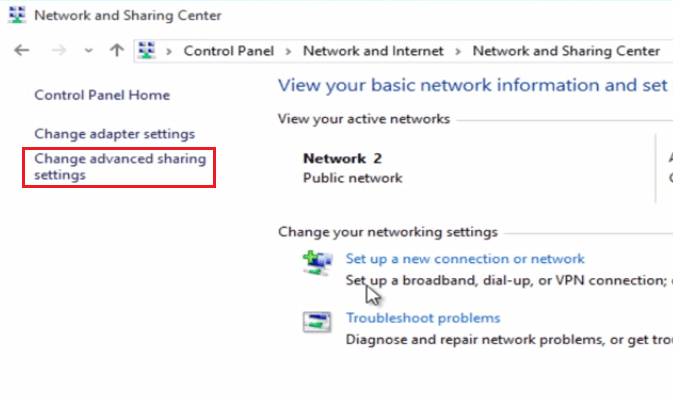
- Click on ‘Change advanced sharing settings’.
- Enable ‘Turn on network discovery’ under ‘Network discovery’ and ‘Turn on file and printer sharing’ under ‘File and printer sharing’. Then, click ‘Save changes’.
- Again, try using Destiny 2 and check if it’s connecting to the server.
Among all the solutions mentioned above you will find a working method to fix the ‘Destiny 2 Servers Not Available’ problem. However, if none of the solutions work for you, then most probably you will have to reinstall the game as its files may have gotten corrupted.